This week, we’re going for the gold medal, that sweet sweet A+ grade on Qualys SSL Labs. And to achieve this lofty goal of ours, we’ll need to enable one thing, HSTS. This is no small task, and for the first time, we might actually break something, and if we’re not careful, for quite some time.
Before We Begin
Note that HSTS is a rather dangerous option to enable, if you don’t fully understand the implications of it. Firstly, HSTS stands for HTTP Strict Transport Security, which isn’t very illuminating. It essentially means that when enabled, your web server will send an extra option in the response headers, telling the client that this website uses only HTTPS, under all circumstances, all the time, no ifs or buts. And not only does that header tell the client this fact, but also how long the client should remember that this is in fact so, this is called the HSTS lifetime. This doesn’t seem too bad, until you notice that the client connecting to an HSTS enabled site should always react to any misconfiguration (bad certificate, HTTP redirects, you name it) by completely dropping the connection. So if you enable this, and you set the lifetime a bit too high, and you make a mistake, it will take quite a while before you clients can use your site again.
Not only isn’t this the only pitfall. Another one is that any HSTS enabled site can only link to other sites using HTTPS within the same domain. So if you site http://www.example.com enables HSTS, then all subdomain sites need to use HTTPS as well, but luckily not HSTS.
If you really want to go off the deep end, there’s a thing called HSTS preload. The way HSTS preloading works is by submitting your site to a registry of HSTS enabled sites that gets baked into browsers. This way, browsers already know that your site only uses HTTPS, and will automatically select it without having to wait for response headers. The downside is that by submitting your site to this registry, you’ve essentially set the HSTS parameter lifetime to infinity, so you better get it right the first time. There is a way to unregister from the list as well, but keep in mind that this process isn’t the quickest. However, all this is a problem only if you suddenly decide to no longer support HTTPS, which in this day and age shouldn’t be very likely.
So you might ask yourself, why even bother with this HSTS-nonsense? Well, think about it, if a nefarious actor manages to get into the network between your browser and your online banking provider’s web servers, and can alter the traffic between them, they could essentially strip out HTTPS from the incoming traffic and present it to you as HTTP, thereby decrypting all your communication, and there would be no way for your browser to know that this isn’t normal. HSTS gives the browser a way to check if a site only supports HTTPS, which essentially foils this attack. There are more complicated scenarios where HSTS is beneficial, but this is a simple enough example. This raw security power of HSTS without any additional overhead for either the client or the server is why Qualys SSL Labs values this parameter so highly and has set it as a mandatory requirement for the A+ grade.
After properly putting the fear of HSTS into you, we can now proceed.
Enabling HSTS with a Short Lifetime
Since HSTS can have quite a lot of unintended impact, we’ll start by enabling HSTS with a very short lifetime, say 1800 seconds aka. half an hour.
Creating a HTTP Profile for HSTS
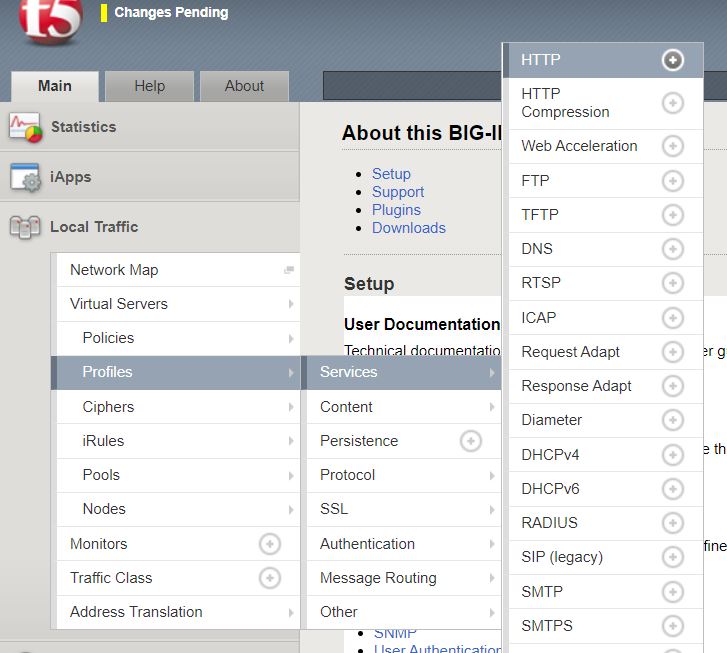
We’ll need to create a new HTTP profile on the Big-IP, so head over to Local Traffic -> Profiles -> Service -> HTTP
Create a new profile and name it http-hsts with the Proxy mode as Reverse and the Parent Profile http
Then scroll down to HTTP Strict Transport Security and check the tick boxes to the far right for Mode and Maximum Age. Then check the box for Enabled and change the Maximum Age to 1800. It should look like this.
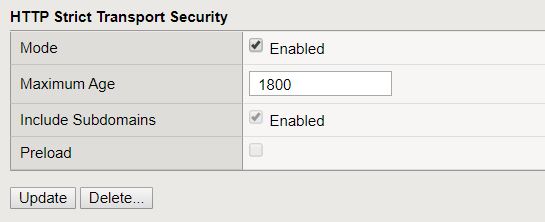
Click update and your new HTTP profile is created will all the same settings as the parent profile except for the HSTS settings.
Note that I’ve used the include subdomains parameter above. This depends on your environment, my examples are taken from a service that uses a subdomain, and the site at the root already has this parameter enabled, so it doesn’t really change anything in my situation, but if you’re implementing this for a site at the root of your domain, you might want to change this to unchecked to start of with.
Enabling HSTS on a Virtual Server
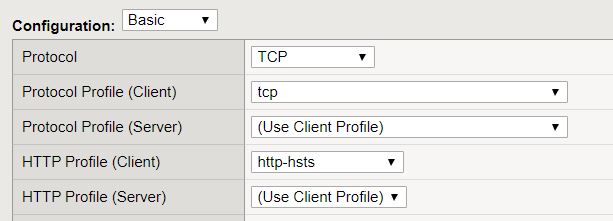
Now we need to edit our virtual server configuration to use our new HSTS profile, so head over to Local Traffic -> Virtual Servers and select your virtual server. At the top you should find the HTTP profile settings. Select the http-hsts profile you just created.
Checking That Everything Works as Intended
Now the waiting game begins. The change will be instant if you check the response headers in Chrome for examples, but not for every response, and it’ll take a while before the SSL Labs test will see this change. I’m not quite sure what’s causing this delay, but I suspect it has something to do with caching. Anyhow, give it an hour or two, and you should see the following at the bottom of the SSL Labs test results.

Now it’s up to you how long you wait before you change it to a value higher than 180 days to satisfy the Qualys gods. I’d say give it a week, that should be plenty enough to find any edge cases that this might impact.
Enabling HSTS with a Long Lifetime
Now that we’re sure that nothing catastrophic happened when we enabled HSTS, we can change our HSTS lifetime to something more appropriate.
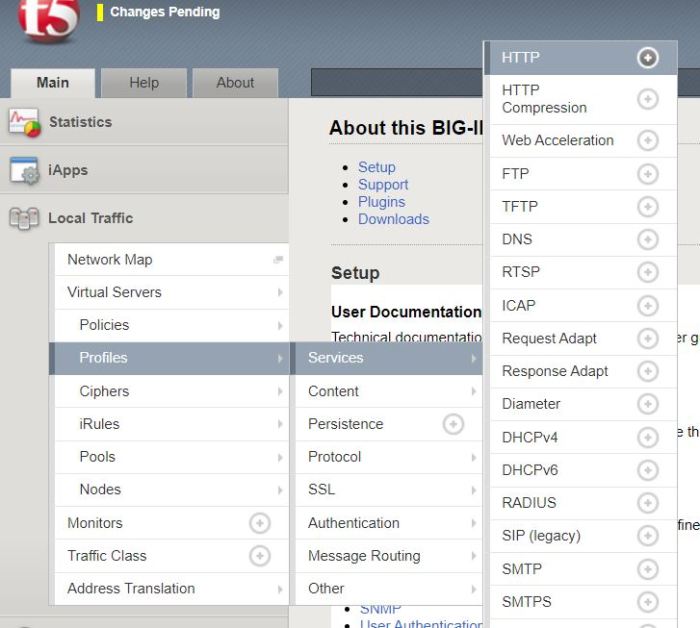
Head over to Local Traffic -> Profiles -> Service -> HTTP and select the http-hsts profile you created.
At the bottom, change the Maximum Age to 16070400 seconds, which happens to be equivalent to 186 days, just a bit over the 180 day requirement of SSL Labs.

After that, select update at the end of the page to update your HTTP profile.
Note that I’ve left the Preload option unchecked, this option is required to be enabled before you can submit your site to the HSTS preload list. However, that’s well outside the scope of this article.
Checking our work
Now we need to wait again for a while before we can go back to SSL Labs and check our grade again. After a few hours, you’ll hopefully be greeted by the A+ grade, as well as the following under the HSTS section.


Also check out the other instalments of this series:
Fixing SSL Labs Grade on F5 Big-IP – Certificate Chains
Fixing SSL Labs Grade on F5 Big-IP – Weak Cipher Suites
Fixing SSL Labs Grade on F5 Big-IP – ECDH public server param reuse
Fixing SSL Labs Grade on F5 Big-IP – Disabling TLSv1 and TLSv1.1
Fixing SSL Labs Grade on F5 Big-IP – Enabling TLSv1.3

Leave a comment